DimensioneX/Day-Night Cycles
This article is being translated into english
If you can't wait or visit this page later, just use Google translation!
About this article
In every game developed with DimensioneX we can implement day/night cycles.
This article explains how to do it.
How it works
So simply, DimensioneX supports the use of transparent images. If in any picture in which you have a piece of sky you make the sky to be transparent, you just need to tell DimensioneX the colour that the sky needs to be.
The game engine will produce a coloured rectangle using the specified color, and it will put this box below the scene picture. If the latter is transparent, that's it.
Prepare the picture
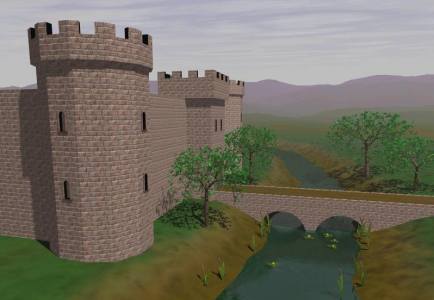
Let's suppose that the picture to be treated is this one:
please note the piece of blue sky. That piece needs now to be made trransparent.
The procedure we describe here is valid for Paint Shop Pro 7, but on other programs it will be quite similar.
1
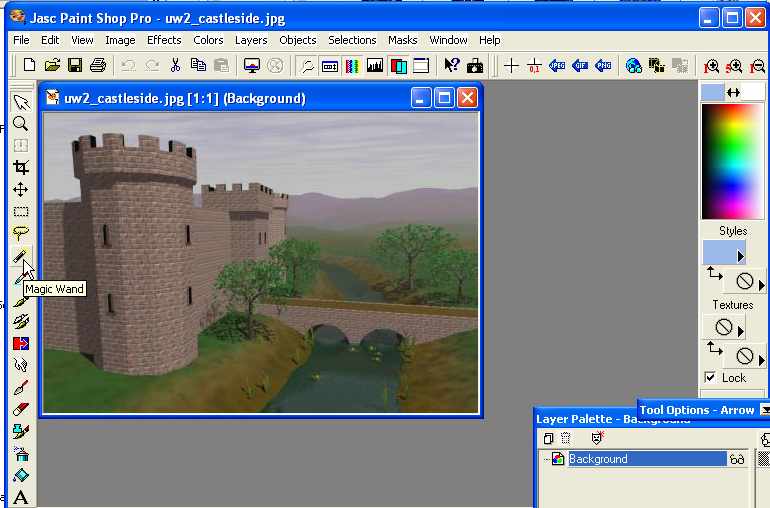
Open the picture with Paint Shop Pro, select the Magic Wand tool
2
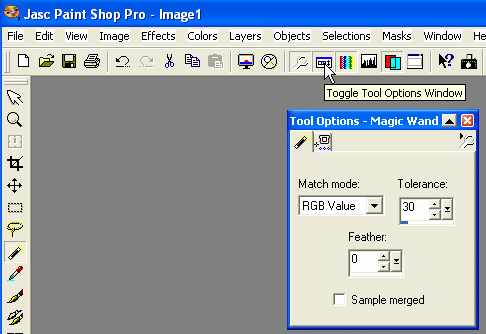
Now you have to look for the "Tool options" window, which influences how the tool works. It is possible that this window is not active and in that case you just make it active by clicking the button as in the following screenshot:
Now just leave Feather to zero.
You have to set the Tolerance parameter to a proper value. This number expresses how many colour levels the sky blue can vary before the selection stops. Here the best value for Tolerance can be different from picture to picture. I recommend to start from 30 and then increase or decrease until the selection is correct.
3
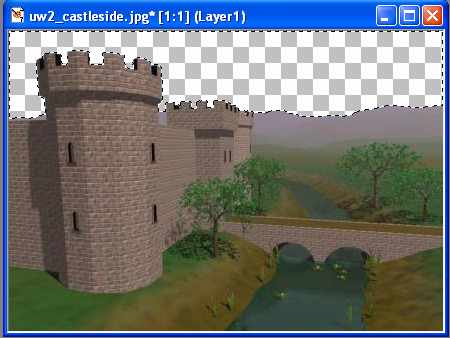
Now you have to select the sky.
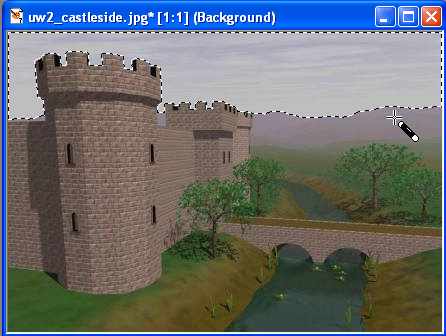
To make the selection, point the want pointer in the blue sky and click. If the selected area is too bug, decrease the Tolerance value. If the selection is only partial, then increase the value.
You can add a selection to the existing selection by keeping the SHIFT key pressed on your keyboard when clicking with the wand. A selection can be subtracted from the existing by keeping the CTRL key pressed while clicking.
In the screenshot, we have managed to select the sky area correctly:
4
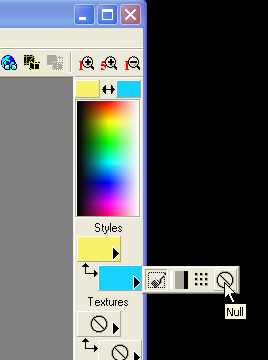
Now verify you have correctly set the background to "no background". This is done by clicking in the palette square for background color (see screenshot below). Aim carefully in the arrow and then select the "Null" icon (see screenshot)
Here, this will mean that the image is about to become transparent
5
Before erasing the selected sky area so and make it transparent you also have to click on this menu command:
menu choose Layers->Promote to Layer.
6
Ora premi il tasto CANC sulla tastiera. Se hai fatto tutto correttamente il cielo sparirà lasciando al suo posto un'area a quadretti che significa che in quel punto l'immagine è trasparente.
7
Ora esportiamo l'immagine.
Puoi esportare nei due formati che supportano la trasparenza ovvero GIF o PNG. Consiglio PNG che produce immagini meno pesanti.
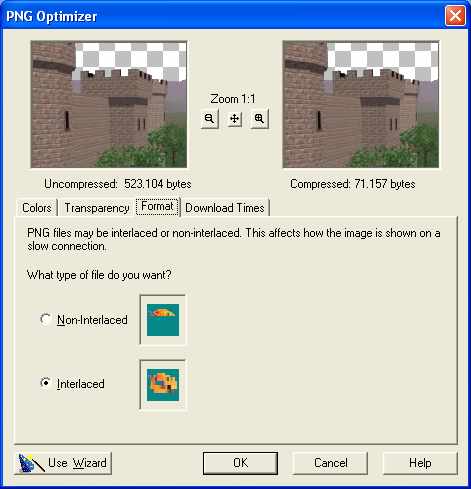
Per esportare usa il menu: File->Export->PNG Optimizer...
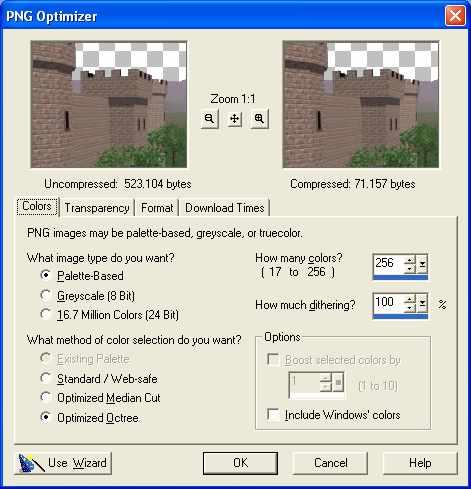
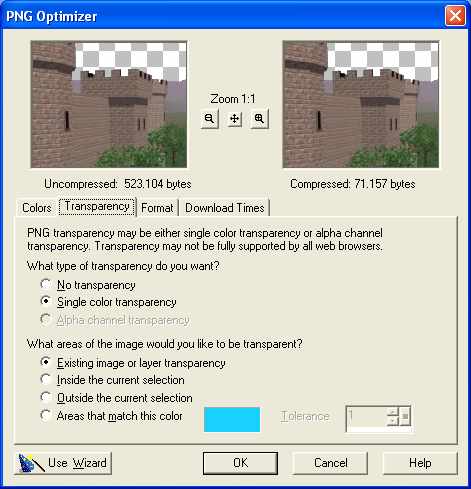
Clicca sulle prime 3 linguette della finestra copiando le impostazioni che vedi qui sotto, una volta impostati correttamente tutti i parametri il programma li ricorderà e diventa immediato per tutte le immagini successive, poi dovrai semplicemente cliccare OK.
Infine clicca OK e salva l'immagine nella cartella delle immagini del tuo gioco.
8
Ora devi modificare il gioco. Ovviamente si cerca di cambiare solo il formato, quindi solo l'estensione dell'immagine, in modo che fare le modifiche sia rapido.
Ad esempio da così...
ROOM rockpath
	NAME	il sentiero
	IMAGE	S	uw2/rockpath.jpg
a così:
ROOM rockpath
	NAME	il sentiero
	IMAGE	S	uw2/rockpath.png
Set the sky color
Ora dobbiamo semplicemente fare in modo che ad ogni istante DimensioneX "sappia" di che colore deve dipingere il cielo.
Il colore è un codice che va impostato nella variabile globale chiamata
bgcolor
o anche
$WORLD.bgcolor
(le due scritture sono equivalenti.
Il codice del colore è un codice HTML. Chi ha un pò di esperienza nel campo sa già di cosa sto parlando, se non sai di che si tratta vai a vedere su Google cercando "codici colori HTML" come parole chiave. Qui basti dire che può essere una cosa semplice del tipo:
bgcolor = "blue"
Oppure un codice esadecimale tipo:
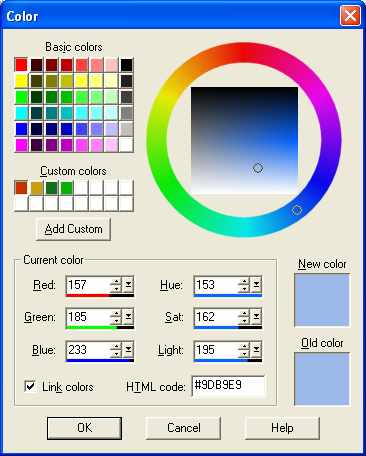
bgcolor = "#9DB9E9"
Nota che questi codici te li dà il buon vecchio Paint Shop Pro, basta cliccare sulla palette del colore per ottenere questa finestrella. Noti il valore "HTML Code" in fondo con il # davanti?
10
Per concludere, ecco una utile routine che nel gioco Underworld viene chiamata ad ogni evento onTick e ovviamente anche all'avvio del gioco (evento onStart). Questa cambia il colore del cielo a seconda dell'ora.
L'idea che sta alla base della funzione getTimeOfDay è che un'ora nel mondo reale corriponda un giorno nel gioco, quindi viene fatto un calcolo in proporzione ai minuti nella funzione stessa. Ovviamente puoi usare ore e minuti reali e fare a meno della getTimeOfDay oppure anche modificarla in modo che le giornate "virtuali" nel tuo gioco abbiano una durata diversa.
Function getTimeOfDay()
	Dim realsecs = 60*getTime("mm")+getTime("ss")
	Dim uwsecs = 24*realsecs
	Dim uwhrs = Int(uwsecs/3600)
	uwsecs = uwsecs - uwhrs*3600
	Dim uwmins = Int(uwsecs/60)
	If uwhrs < 10
		uwhrs = "" + "0" + uwhrs
	End_If
	If uwmins < 10
		uwmins = "" + "0" + uwmins
	End_If
	'uwsecs = uwsecs - uwmins*60
	Return "" + uwhrs + ":" + uwmins
End_Function

Sub nightDayCycle
	Dim hr = Int(Left(getTimeOfDay(),2))
	Dim nowday = (hr >= 6 And hr <= 21)
	If nowday <> itsday ' sunset/dawn
		If nowday
			Speak SYS,$WORLD,"E' un nuovo giorno nel regno...","Il sole si è alzato!","Vampiri in ritirata!"
			$WORLD.bgcolor = "#9DB9E9"
		Else
			Speak SYS,$WORLD,"Un giorno finisce...inizia la notte!","Il sole è tramontato!","Attenzione ai vampiri!"
			$WORLD.bgcolor = "#000055"
		End_If
		PlaySound $WORLD,"churchbell.wav"
		itsday = nowday
	End_If
End_Sub
This tutorial is over.
If in doubt, post on the FORUM!
- back to DimensioneX WIKI main
