DimensioneX/Installation Manual: Difference between revisions
| Line 131: | Line 131: | ||
# Open with your browser the following URL: | # Open with your browser the following URL: | ||
<nowiki>http://localhost:8080/dimx< | <nowiki>http://localhost:8080/dimx</nowiki> | ||
This will open the DimensioneX menu page: | This will open the DimensioneX menu page: | ||
Revision as of 04:36, 5 April 2016
back to DimensioneX WIKI main and Italian WIKI
DimensioneX version 6.0 Installation Manual
- Note
- This is a WIKI document. If you find there is an error, you can EDIT this page directly, by clicking on the EDIT tab. Registration is recommended. If you want to practice on WIKI please don't do so on this document but do it here: DimensioneX/Sandbox
Preliminary Note
This is a fully-detailed installation manual. Preliminary information about DimensioneX and a quick installation roadmap is given in the README file. If you have problems installing the product even after following these instructions, please go to DimensioneX support for getting help.
Installing DimensioneX
Basically, DimensioneX gets installed with the following 3 steps:
- Install Java (version 1.4.2 or higher required, J2SE-SDK edition recommended)
see section "Installing Java" - Install the web server (recommended: Tomcat 5.0.28)
see section 2.2 - Installing the webserver - Install Dimensionex files in the web server’s tree
see section 2.3 - Installing DimensioneX files. When done, you can - Test your installation and play the demo game “The Beach”. see section "Testing and running DimensioneX"
This README describes a detailed procedure which should work on any Windows system. These instructions have been written and tested on the following, recommended components:
- Java2 Standard Edition (J2SE) – Software Development Kit (SDK) 1.4.2 (higher version is OK)
- Tomcat 5.0.28 (Tomcat 5.5 is also OK)
For other systems/web servers/versions you will have to adapt these instructions. In case of need please always refer to the Support section on the DimensioneX web site
Installing Java
These instructions tell you how to install the following Java edition/distribution: J2SE – SDK.
Please note that the using J2SE-SDK version 1.4.2_05 is recommended, but not mandatory. If you are already familiar to Java, you may skip the notes below.
Notes
- Older versions of Java (such as 1.3.1 or 1.2.0) cannot be used with DimensioneX.
- Java releases equal or higher than 1.4.2 are all OK. Please always check that the webserver you will be using is designed to run for the Java version you are using. If you’re not sure, just stick to our recommendations.
- We will deal in this text with the terms “Java2” and “Java” as they were synonyms. The reader should never bother about the “2” appended to the “Java” word, because it definitely does not represent the actual Java version number (I don’t know why the authors of Java decided to introduce this nomenclature, to me it’s simply misleading)
- When, on the Java website you see “Java2 5.0” you should be aware that “5.0” is just another misleading marketing tag they gave to the Java platform. To humans, this equals to “Java version 1.5”
- Java currently comes in three main editions: EE (Enterprise Edition), SE (Standard Edition) and ME (Mobility Edition). ME is not good for our purposes, EE uses features that DimensioneX don’t use, so SE is recommended.
- While downloading Java SE, you can further choose between the full distribution (SDK – Software Development Kit) and the runtime-only version (JRE – Java Runtime Environment) which is smaller in size. For DimensioneX purposes, there is no big difference although webserver installation while using the SDK resulted to be simpler. If you need to save download time, you could download the JRE which is a little smaller. If you don’t mind downloading a bigger file, especially if you plan to develop java-related software, then follow our recommended choice and download the SDK whose size is around 50MB.
- Right before downloading Java, windows user should choose between “Online installation” and “Offline installation”. The “Offline installation” is the complete package with everything in it. The “Online installation” package is just a small program which asks you for what you want to install, and then downloads and installs the components you asked for. This is the best choice until you are steadily connected to the internet and until you are installing on just one computer. “Offline installation” is a longer download but it is the safest method.
Installation
- Double-click the executable containing the Java software to start its guided setup program.
- After accepting the license agreement, just accept the default options.
- (Optional) For particular installations (especially if you had troubles installing the webserver) it is recommended to ask for Custom installation and to specify the installation to done into a custom folder you will specify, located on the C: drive, such as: “C:\J2SE”.
Installing the webserver
These instruction tells you how to install Tomcat 5.0
Please note that the using the Tomcat 5 webserver is recommended, but not mandatory. Any web server capable to run Java servlets should be OK, even though you will have to adapt the instructions. On the DimensioneX web site, Documentation section, you will find specific instructions about how to install and configure: Tomcat 3.3, Tomcat 4.0.x, Tomcat 4.1.x, Blazix 1.1 (and possibly other web servers) for use with DimensioneX. In fact, a set of WEB.XML files have been provided to match to different Tomcat servers.
1. Please verify you have downloaded Tomcat as a self-installing executable (.exe extension) and NOT as a ZIP file, because in the latter case the installation and configuration procedure will be harder.
2. Double-click the executable containing the Tomcat software to start its guided setup program.
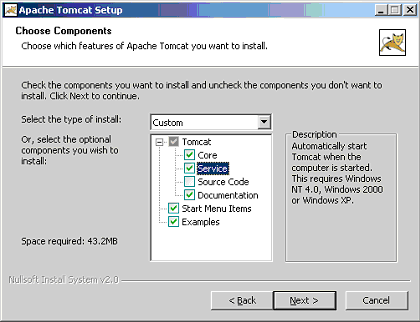
3. After accepting the license you will be prompted this window:
4. By enabling the “Service” component, you will be able to have Tomcat running automatically as a service each time Windows starts. It is suggested that you enabled this component, even though you can disable this service later, and start it manually.
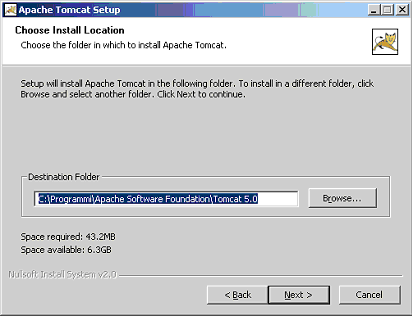
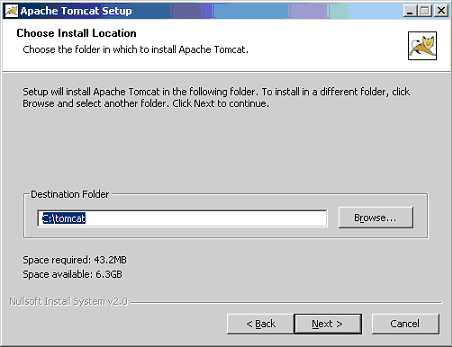
For your own convenience, don’t allow Tomcat to be installed in a far-nested folder! Change the destination folder to the following:
C:\tomcat
This will save you LOTS of time during development.
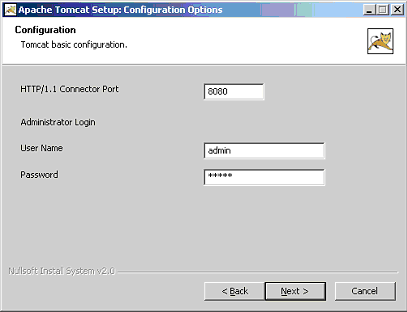
5. Next, you will be prompted this:
you are asked to set the admin password (your choice) and the web server port. Our recommendation is to leave the port to 8080 and to set the admin password to a value that you will remember (this is useful for administering the server via remote, if you need to).
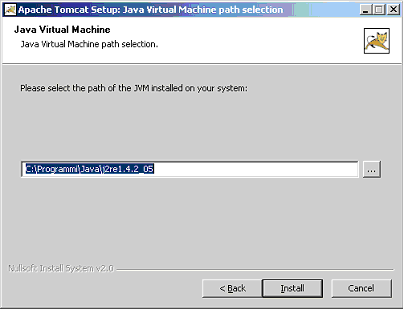
6. The setup program now tries to detect the Java folder. If you have Java2 SDK installed on Win2000 and WinXP this should work automatically and this window should appear:
If so, just click Install. If not, help the setup program finding out where Java is by clicking the [...] button and selecting the proper folder. When done, click Install.
The files are now copied.
A Start menu group is created so that you can easily start and stop the webserver by clicking the provided icons.
7. It’s now time to test your webserver. When you click the “Start Tomcat” icon a black window should appear with some startup messages
and you should be able to access the local web server by typing in your browser the following URL:
http://localhost:8080/
You should get the Tomcat welcome page.
Installing DimensioneX files
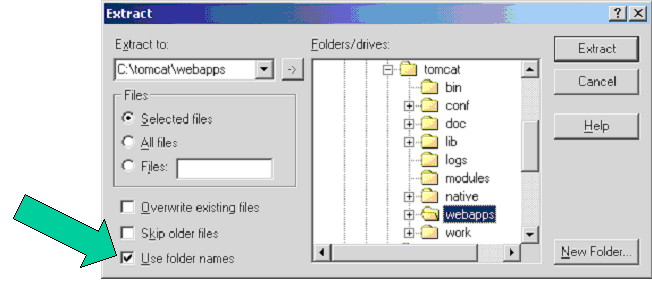
1. Unpack the content of the KIT (it’s a ZIP file) under the webserver’s content folder. Supposing you followed our recommendations, this folder will be “C:\tomcat\webapps” folder on your computer. Ensure you are preserving the packed folders structure (see checkbox in the picture below, in case you are using WinZip)
2. If you did it correctly, a new folder will be created: “dimx” with several files and folders inside.
3. DimensioneX comes pre-configured for Tomcat 5 so, if you are using Tomcat 5 or 5.5 you should be able to run the demo game “The Beach” straight away, just see next section.
In case you are using a different webserver or Tomcat version:
a) Delete (or rename) this file: dimx/WEB-INF/web.xml . This file simply defines a short alias name for the game engine servlet, and its content is valid only for Tomcat 5 or 5.5
b) In the WEB-INF folder, identify the file which applies to the Tomcat version you are using. For example, web_tomcat33.xml will work on Tomcat 3.3. Rename it to web.xml and stop/restart your webserver.
Testing and running DimensioneX
If you followed our recommendations and have DimensioneX installed on Tomcat 4:
- Stop and restart your web server (icons in the Start/Programs menu).
- Open with your browser the following URL:
http://localhost:8080/dimx
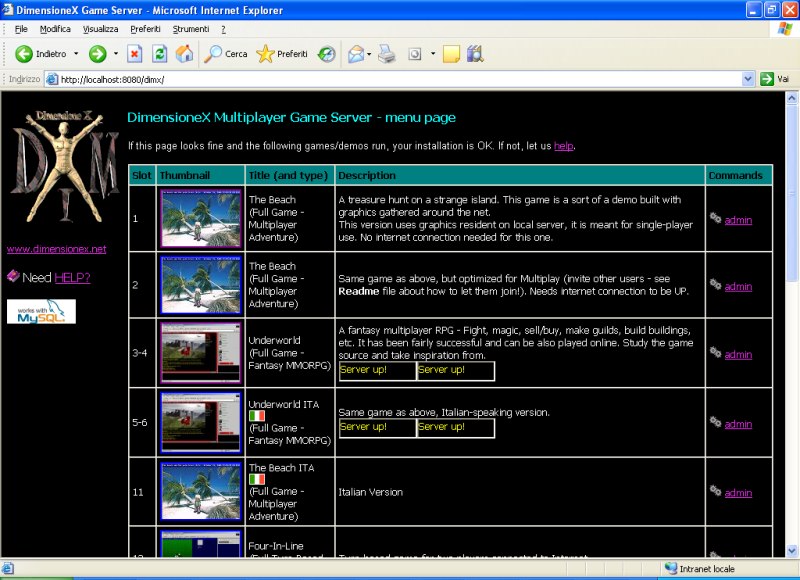
This will open the DimensioneX menu page:
This is just a static HTML page. Please DON'T open it via the filesystem (i.e. browsing from My Computer icon) because it won't work - you must pass through a running webserver.
If the game engine is correctly installed and configured you should be able to get from here to the game named "The Beach" which should be found in server slot number 1 :
http://localhost:8080/dimx/servlet/multiplayer?game=1
Note: Server slots are numbers to which we associate games. Your server can host unlimited games, each one associated to a server slot.
3. Now you are able to connect and play the game The Beach.
DimensioneX is up and running, and you are already able to play online! Don’t you believe it? Consult now the paragraph “Playing on-line with other users” in the README file.
The DimensioneX log file
There is a log file which you may read to help you diagnose any problems. It is named debugN.log (where N is a number representing the game slot to which your game is associated) and you should find it in the tomcat/webapps/dimx/WEB-INF/system folder. This file is created after the first startup of DimensioneX engine.
When you begin to get in confidence with DimensioneX, try and modify the DimensioneX configuration file (see the section "Configuring DimensioneX" below) starting from the worldFile setting, which specifies which one of the provided world files has to be loaded when the DimensioneX engine starts. See section below: #Games_and_demos_in_this_kit for available DXW files to choose from.
To make the server re-read the settings (and possibly load a different DXW file) it is not sufficient to edit the DimensioneX configuration, but it is necessary to do also one of the two things below:
- Force the restart by means of the admin page (See section “The administrator page” below). This option is the fastest. If it does not work and you’re in doubt there’s a bug in the restart functionality of the engine (it may happen…) then try the second method
- Stop and restart the web server. This is an extreme measure but if it does not work then it’s for sure that you have an error in the DimensioneX configuration or world file.
Games and demos in this kit
| File | Description |
|---|---|
| World3.dxw (pre-installed choice) | This is “The Beach” a complete multiplayer adventure game. The goal is to enter in the cellar under the bar, where a surprise awaits you. Official site: http://www.dimensionex.net/thebeach/multiplayer.htm If you examine carefully the code of the game you will discover how several features of the game have been implemented. |
| World3net.dxw | Notice: To play this one you need to be connected to the InternetIt is identical to World3, but is configured to let other users to play with you in multiplayer mode with an optimised configuration for network use named “configuration A – light and distributed”. If you play World3 with three, four or more friends and you see the game slows down, then try World3net. You will see that the performance will be dramatically better while playing with many users. To learn more about this network mode: http://www.dimensionex.net/en/docs/art003.htm |
| Underworld.dxw | Notice: To play this one you need to be connected to the Internet It is a massive multiplayer RPG Game: Underworld Online.A castle is being taken over by an army of monsters. In this graphical fantasy MMORPG you can either fight and try to save the reign, or you can join the evil forces. Combats, Magic, Weapons, Spells. Has music and sound.Official game site: http://www.dimensionex.net/underworld/ |
| Underworld_it.dxw | Notice: To play this one you need to be connected to the Internet Same game, version in Italian language. |
| World1.dxw | This is a basic world consisting of a room only (a beach) and an item only. It is useful only to chat with friends or to start a new game project. |
| World2.dxw | This is a little more complex environment, it has three rooms and an item (a box) which contains another (an apple). Demonstrates how to use built-in commands panels. You have also a switch that allows you to switch from some sort of Chat Mode to a sort of Adventure Mode: at this point (you will be eventually able to open the box) the game continues until someone picks the apple up. Once this happens, the game ends and restores Chat mode. It could be a good starting point to develop a game of your own. |
| demovehicles.dxw | Demonstrates how vehicles can be implemented with a built-in facility. Create great robot battle games by starting from here! |
| demopanels.dxw | A demo showing how commands panel can be customised |
| demoarea1.dxw | A demo showing how multi-area games can be implemented. This is Area 1 and you can get from here to Area 2, and back. |
| demoarea2.dxw | Area 2 for the multi-area demo. |
| demoturnbased.dxw | A turn-based game (simple chess game). Demonstrates how ARRAYs can be used to implement turn-based games (any kind of board games, chess, reversi, table RPGs, everything!) |
More games and demos may be downloaded from the DimensioneX web site, in the Resources section.
Configuring DimensioneX
To configure DimensioneX for a specific game you have to edit the file: worldnavN.properties (N is the server slot to which the game should be associated). This file must be located in the tomcat/webapps/dimx/WEB.INF/system folder.
| Setting | Meaning |
|---|---|
| worldFile=World3.dxw or, as well, worldFile=http://www.domain.com/path/to/worldfile.dxw | Fundamental.Tells DimensioneX which is the file (that is, the game) to be loaded at startup. The game file should be placed in the same folder as the configuration file.Alternatively, if your PC is connected to the network, you can also specify an URL which will cause the DXW game file to be fetched and loaded automatically at startup. |
| debugTo=file debugTo=consoledebugTo=none | Tells where the engine output goes. file: If you specify "file" then the output goes to the file:debug.log so it is easier to understand where problems occurred.Note: Beware, remember you have to delete the log file sometimes, otherwise it will waste more and more space!console: the output goes to the console (small window on the server’s screen)none: No debug information is produced. Obviously this allows the game to run at max speed. |
| adminPasswd=pwd | Specifies the administrator password, the one requested by administrator page and the maintenance page (see section about Administration page in the Developer’s Reference). |
More settings and configuration issues are explained in specific sections in the DimensioneX Developer’s Reference document, available from the DimensioneX doc page.
- back to DimensioneX WIKI main

